TeamsPhisher is a Python3 software that was designed to make it easier for phishing messages and attachments to be sent to users of Microsoft Teams whose companies or organizations permit connection with outside parties. It is not feasible to transfer files to users of Teams who are not part of one’s company in most circumstances. Recently, Max Corbridge (@CorbridgeMax) and Tom Ellson (@tde_sec) from JUMPSEC published a means to circumvent this limitation by modifying HTTP requests made by Teams in order to change who is sent a message with an attached file.
TeamsPhisher utilizes a number of other techniques, including some of Andrea Santese’s (@Medu554) older ones, in addition to this one.For the authentication component of the attack flow as well as other basic utility functions, it relies significantly on TeamsEnum, a brilliant piece of work that was developed by Bastian Kanbach (@bka) of SSE.

TeamsPhisher’s goal is to include the most useful aspects of the aforementioned projects in order to provide a method that is robust, fully adaptable, and highly effective for authorized Red Team operations to use Microsoft Teams for phishing in access-related circumstances.
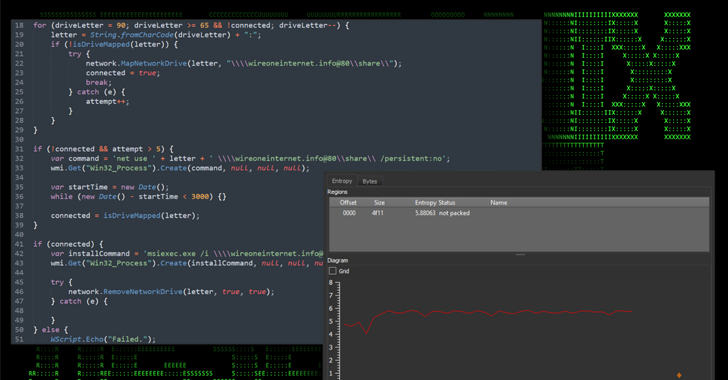
You will need to provide TeamsPhisher with an attachment, a message, and a list of people to target. After that, it will go over the list of targets while simultaneously uploading the attachment to the sender’s Sharepoint.
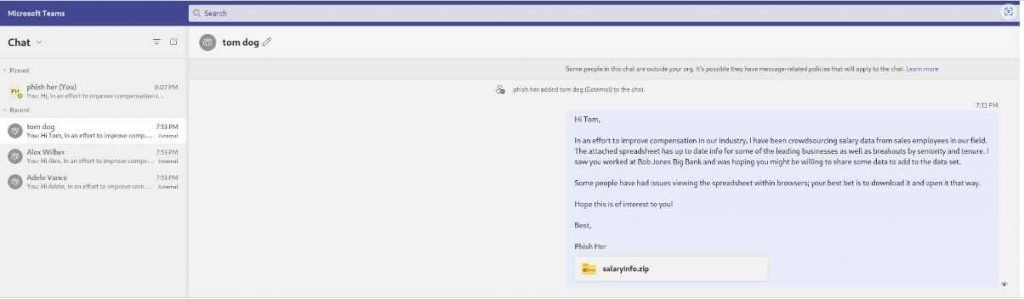
First, TeamsPhisher will enumerate the target user and check to see whether that person really exists and is able to receive messages from the outside world. After that, it will initiate a new conversation with the person you choose. Note that this is technically a “group” conversation since TeamsPhisher contains the target’s email address twice; this is a clever hack from @Medu554 that will circumvent the “Someone outside your organization messaged you, are you sure you want to view it” splash screen that might offer our targets a reason to stop and think twice about viewing the message.
The user who was identified will get the message that was sent to them along with a link to the attachment that was stored in Sharepoint after a new thread has been established between our sender and the target.
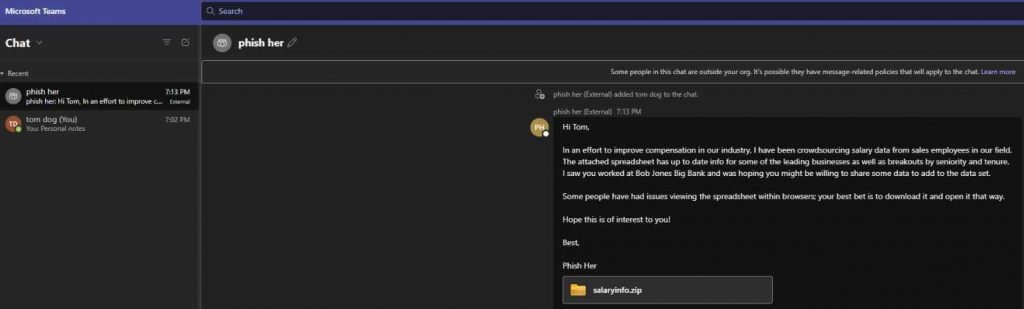
After this first message has been sent, the newly established thread will be visible in the sender’s Teams GUI and may be engaged with manually, if necessary, on a case-by-case basis. Users of TeamsPhisher are required to have a Microsoft Business account (as opposed to a personal one such as @hotmail, @outlook, etc.) that is licensed for both Teams and Sharepoint in order to utilize the software.
This indicates that you will require an AAD tenant as well as at least one user who has a license that corresponds to it. At the time of publishing, the AAD licensing center does have some free trial licenses available for download that are capable of meeting all of the prerequisites for using this product.
Before you may utilize the account with TeamsPhisher, you will have to ensure that you have at least once successfully logged into the personal Sharepoint site of the user with whom you will be exchanging messages. This should be something along the lines of tenantname-my.sharepoint.com/personal/myusername_mytenantname_onmicrosoft.com or tenantname-my.sharepoint.com/personal/myusername_mytenantname_mycustomdomain_tld. Alternatively, you could also use tenantname-my.sharepoint.com/personal/myusername_mytenantname_onmicrosoft.com.
In terms of the needs of the local community, We strongly advise upgrading to the most recent version of Python3. You will also require the authentication library developed by Microsoft:
To upload the file to a Sharepoint site, you will need to manually give the site’s name. This would most likely be required in the event if the sender’s tenant makes use of a unique domain name (for example, one that does not adhere to the xxx.onmicrosoft.com norm). Just the singular name should be used; for instance, if your SharePoint site is located at mytest.sharepoint.com, you should use the –sharepoint mytest option.
Replace TeamPhisher’s standard greeting (“Hi,”) with a personalized greeting that will be appended to the message that is supplied by the –message option. For instance, “Good afternoon,” or “Sales team,” are examples.
By default, the Sharepoint link that is provided to targets may be accessed by anybody who has the link; to restrict access to the Sharepoint file so that it can only be viewed by the target who got it, use the –securelink option. It’s possible that this will help shield your virus from the blue team.
TeamsPhisher will make an effort to determine the first name of each person it is targeting and will use that name in the welcome it sends to them. For instance, [email protected] would get an email with the greeting “Hi Tom, ” as the first line of the message. This is not ideal and is dependant on the format of the emails that are being targeted; use the –preview option to see whether or not this is a suitable match for the list of emails that you are targeting.
The preview version of TeamsPhisher will be executed. This will NOT send any messages to the target users; instead, the “friendly” name that would be used by the –personalize option will be shown. In addition, a sample message that is indicative of what targets would receive with the current settings will be delivered to the sender’s Teams. You may log in to check how your message appears and make any required adjustments to it.
You may choose to have a delay of x seconds between each message sent to targets. Can be of assistance with rate-limiting concerns that may arise.
TeamsPhisher will determine which accounts are unable to receive messages from third-party organizations, which accounts do not exist, and which accounts have subscription plans that are incompatible with the attack vectors.
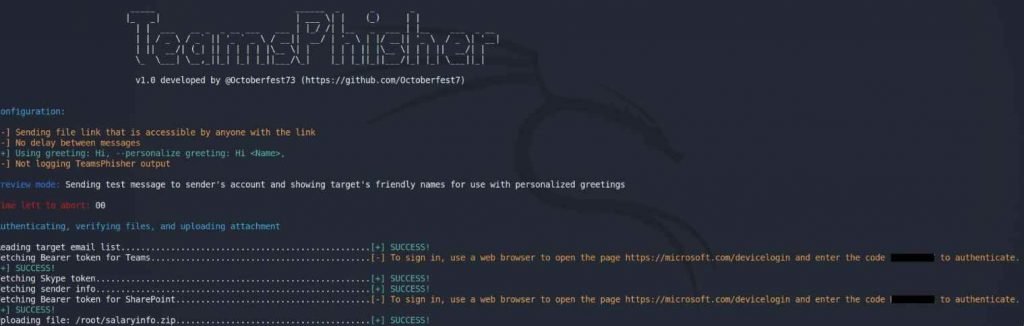
TeamsPhisher now enables login with sender accounts using multifactor authentication (MFA), thanks to code contributed by the TeamsEnum project.
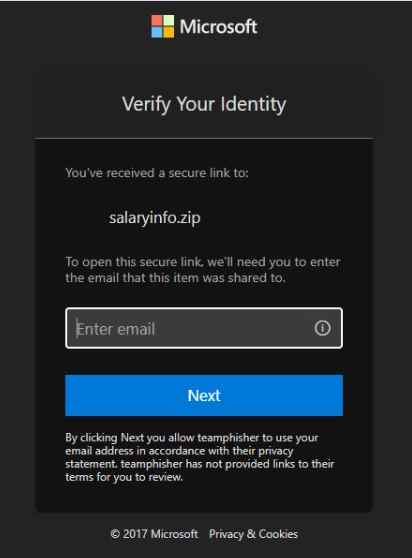
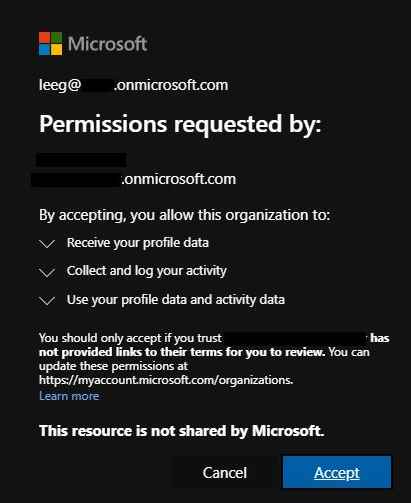
If you use the –securelink flag, the recipients of the message will see a popup asking them to verify themselves before they can view the attachment in Sharepoint. You have the ability to determine if this adds an excessive number of additional steps or whether it adds ‘legitimacy’ by sending them via the actual Microsoft login feature.
Mitigation
By changing the choices associated with external access, which can be found in the Microsoft Teams admin center under Users > External access, companies may reduce the risk that is provided by the vulnerability that has been discovered.
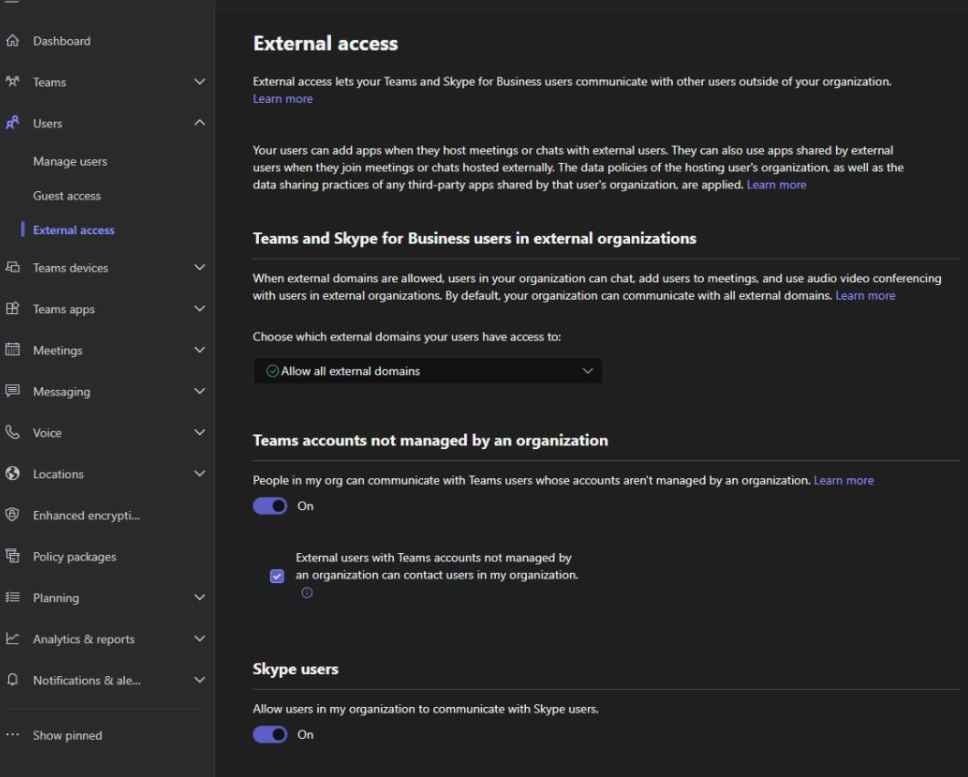
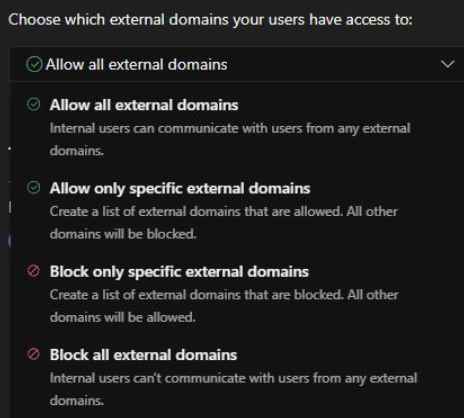
Organizations are provided with the freedom to pick the optimal rights to match their requirements by Microsoft, including the ability to whitelist just particular external tenants for communications and a global block that prevents any communications from occurring.


He is a well-known expert in mobile security and malware analysis. He studied Computer Science at NYU and started working as a cyber security analyst in 2003. He is actively working as an anti-malware expert. He also worked for security companies like Kaspersky Lab. His everyday job includes researching about new malware and cyber security incidents. Also he has deep level of knowledge in mobile security and mobile vulnerabilities.